另一項被大家所期待的就是 Flux ,
官方也特此開了一個站點去詳細介紹這個資料流概念,
各位點進去就會看到下面這張圖片。
 |
| 擷取自 ReactJS 官方網站 |
第一次我聽完 小翊 介紹完 Flux 與 ReFlux ( 國外某人把 Flux 簡化後推出的 Lib)
完全是空有概念很難想像實際要寫的時候該如何實作。
今天就是給各位展示如何使用 JavaScript,
然後完全不用任何 Framework 去展現 Flux 架構與精神。
首先,要來定義 Flux 架構。
大家可觀察到扣除 Render 後其實跟官方的圖片其實就差不多一致了。
由於 Render 的工作內容已由 ReactJS 取代掉了,
所以 Flux 資料流中並沒有出現這個角色在。
今天要展示的 JavaScript 需求如下︰
看到這可能一堆人會說「根本是在汙辱我」、「很簡單啊」
舉 jQuery 來說好了,
來個監聽 input keyup 事件就搞定了。
但篇幅就是要來介紹如何不使用 Framework 並且套入 Flux 架構去完成。
而不是用各位熟悉的框架去達到此目的。
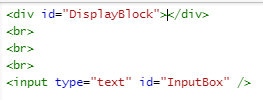
先定好下方的 HTML。
一般如果要監聽會經常看到以下這樣寫︰
Dispatcher.js
var Dispatcher = {
init: function(){
this.displayBlock = document.getElementById('DisplayBlock');
this.inputBox = document.getElementById('InputBox');
//監聽
this.displayBlock.addEventListener('click', function(){
//do something...
});
this.inputBox.addEventListener('keyup', function(){
//do something...
});
}
};
如果想要把 function 獨立出來可以這樣變化︰
var Dispatcher = {
init: function(){
this.displayBlock = document.getElementById('DisplayBlock');
this.inputBox = document.getElementById('InputBox');
//監聽
this.displayBlock.addEventListener('click', this.clcik1);
this.inputBox.addEventListener('keyup', this.keyup1);
},
click1: function(){
//do something...
},
keyup1: function(){
//do something...
},
};
如果再 click1 跟 keyup1 中想使用 dispatcher 的變數或方法︰
var Dispatcher = {
init: function(){
this.displayBlock = document.getElementById('DisplayBlock');
this.inputBox = document.getElementById('InputBox');
//監聽
this.displayBlock.addEventListener('click', this.clcik1.bind(this));
this.inputBox.addEventListener('keyup', this.keyup1.bind(this));
},
click1: function(){
//do something...
},
keyup1: function(){
//do something...
},
};
到目前為止大家應該都能接受,
如果要切的乾淨就再把 function 切出去。
但是重新檢視一下我們的 Flux 視圖,
我們應該要把元素跟事件分離乾淨,
所以需要把事件註冊到統一的分配器,
再針對不同的事件做處理,
這時候我們就可以用到 JavaScript 內建的 handEvent 了。
var Dispatcher = {
init: function(){
this.displayBlock = document.getElementById('DisplayBlock');
this.inputBox = document.getElementById('InputBox');
//監聽
this.displayBlock.addEventListener('click', this);
this.inputBox.addEventListener('keyup', this);
},
handleEvent: function(e){
switch(e.type){
case 'click':
switch(e.target){
case this.displayBlock:
this.click1();
break;
}
break;
case 'keyup':
switch(e.target){
case this.inputBox:
this.keyup1();
break;
}
break;
}
},
click1: function(){
//do something...
},
keyup1: function(){
//do something...
},
};
這樣就完成了呼叫的統一了,
而且也不用寫 bind(this) 就能呼叫到 dispatcher 內的變數與方法。
如果需要反註冊的話可以使用︰
this.displayBlock.removeEventListener('click', this);
為了將資料處理分離,我們需要一個 Store (資料處理器) 來負責處理,
Store.js
function Store() {
this._data = 0;
}
Store.prototype = {
getSomething: function (){
return this._data;
},
setSomething: function (val) {
this._data = val;
}
};
Dispatcher.js
var Dispatcher = {
init: function(){
this.displayBlock = document.getElementById('DisplayBlock');
this.inputBox = document.getElementById('InputBox');
//click 事件在此需求無需關注
//this.displayBlock.addEventListener('click', this);
this.inputBox.addEventListener('keyup', this);
this.store = new Store();
}
//略
};
資料分配器 Store 應該避免掉從外部直接改變
可以在呼叫端使用 window.DispatchEvent 發送自訂事件 CustomerEvent ,
並在 Store 內接收自訂事件去做到。
所以在觸發行為時也不會去撰寫 Store.doSomething()
Store.js
function Store() {
this._data = 0;
}
Store.prototype = {
init: function(){
window.addEventListener('store_set',this);
},
handleEvent: function (val) {
switch(e.type){
case 'store_set':
this.setSomething(e.detail.val);
break;
}
},
getSomething: function (){
return this._data;
},
setSomething: function (val) {
this._data = val;
}
};
Dispatcher.js
var Dispatcher = {
init: function(){
this.displayBlock = document.getElementById('DisplayBlock');
this.inputBox = document.getElementById('InputBox');
this.inputBox.addEventListener('keyup', this);
this.store = new Store();
this.store.init();
},
handleEvent: function(e){
switch(e.type){
/*
case 'click':
switch(e.target){
case this.displayBlock:
this.click1();
break;
}
break;
*/
case 'keyup':
switch(e.target){
case this.inputBox:
//觸發自訂事件
window.dispatchEvent(new CustomEvent('store_set',
{'detail':{'val':this.inputBox.value}}
));
break;
}
break;
}
}
// click1() & keyup1() 這2個假事件可以拿掉無需關注
};
最後來做出 Render 來改變畫面,
透過 Store 發送通知 Render 來繪製。
Render.js
var Render = {
init: function(element, Store){
this.element = element;
this.store = Store;
window.addEventListener('render_view', this);
},
handleEvent: function(e){
switch(e.type){
case 'render_view':
this.element.textContent = this.store.getSomething();
break;
}
}
};
Store.js
function Store() {
this._data = 0;
}
Store.prototype = {
init: function(){
window.addEventListener('store_set',this);
},
handleEvent: function(e){
switch(e.type){
case 'store_set':
this.setSomething(e.detail.val);
break;
}
},
getSomething: function () {
return this._data;
},
setSomething: function (val) {
this._data = val;
window.dispatchEvent(new CustomEvent('render_view'));
}
};
Dispatcher.js
var Dispatcher = {
init: function(){
this.displayBlock = document.getElementById('DisplayBlock');
this.inputBox = document.getElementById('InputBox');
this.inputBox.addEventListener('keyup', this);
this.store = new Store();
this.store.init();
Render.init(this.displayBlock, this.store);
},
handleEvent: function(e){
switch(e.type){
case 'keyup':
switch(e.target){
case this.inputBox:
//觸發自訂事件
window.dispatchEvent(new CustomEvent('store_set',
{'detail':{'val':this.inputBox.value}}
));
break;
}
break;
}
}
};
Dispatcher.init();
所以上述程式碼實現︰
由 Dispatch 註冊 Render,並傳入 Store 與所需的 View 元件,
資料更新完全由 Store 控制,
Render 去渲染 View 元件。
透過大量的 handleEvent 降低邏輯,資料,與介面元件之間的關聯程度。
之後再去研究 Flux 與 ReFlux 應該也比較好上手。
以上程式範例參照 Gasolin 發表的一篇漸進改善程式碼的組織方式的文章加以修改。
友善連結︰


沒有留言:
張貼留言